Breakfast Smoothie Bowls

smmothie`Today I want to share with you a really quick post for some absolutely delicious breakfasts! I introduce to you SMOOTHIE BOWLS! I have become obsessed with these lately. I tried them out last year and was completely unsuccessful. I didn’t realise the key to it was freezing bananas for the right ‘ice cream’ like consistency, (which can also be achieve by adding avocados… a tip from my blogger friend Beth.. whose blog you can read here). Without adding in avocado or froze bananas, you will end up with a very liquid-y smoothie- not what we are going for here at all.

Another thing I love about smoothie bowls is how versatile they can be.. you can literally add any toppings you want.. whatever takes your fancy! I am a huge fan of topping them with homemade buckwheat granola, and a lot of fresh fruit, especially passion fruit! smootie1

Chocolate Smoothie Bowl

3 Frozen Bananas (you want to freeze them chopped off with the skin OFF!)
1 Tbsp Cacao/Carob Powder
Dash of Almond Milk, just enough to help it blend.

Raspberry Smoothie Bowl 

2 Frozen Bananas
1/4 Cup Frozen Pineapple
Handful Raspberries
1/2 Avocado
Dash of water, just enough to help it blend!

Easy Peasy Granola

vscocam-photo-1-4vscocam-photo-3-4 I attempted making granola a couple of times last year, and failed miserably on both attempts. Getting the timing right is an art, you must check on it consistently and not wander off to do other things while it cooks, as leave it for a little too long and you’ll have something that will taste like burnt popcorn! Thankfully, I have now managed to nail it, purely by making sure I remain in the kitchen the entire time. Another important tip is to make sure you stir it often.. I’m talking every 3 minutes or so, so nothing at the edge sticks and gets burnt!

I am sharing with you the recipe I currently use to make granola, but it is very interchangeable depending on what you like. I start with a base of oats, and add in any nuts or seeds I have in the kitchen, or fancy that day. Anything works, you really can’t go wrong with the recipe, so tweek it as you want! (Unless you cook it for too long.. as it quite easy to go very wrong with burnt granola, but I think I have already covered the bases on how to ensure that doesn’t happen..)

Another last thing I want to share with you is a new shop I discovered in Bristol this week.. May be useless to a lot of you but to the readers I have in Bristol you will thank me for it! A friend recommended it to me and I couldn’t believe I hadn’t heard of it before! Its called Scoop Away and you can find it on Gloucester Road in Stokes Croft, and the selection they have there is amazing. This little shop is full of loose nuts, seeds, grains and dried fruits, and you literally just scoop up as much or as little as you want! Which is amazing when you only need a tiny bit of a super expensive ingredient you’d normally have to buy in bulk. Another advantage is this massively saves on the packaging and food waste.. and who could complain about that?!

vscocam-photo-2-5

Makes one very large container of granola

2 Cups Rolled Oats
1/2 Cup Sunflower Seeds
1/2 Cup Pumpkin Seeds
1/2 Cup Buckwheat Grouts
1/2 Cup Chopped Almonds
1/2 Cup Chopped Hazelnuts
5 Tbsp Coconut Oil
5 Tbsp Honey/Maple Syrup
1/4 Cup Desiccated Coconut
1/4 Cup Dried Cranberries

Place the oats, seeds, buckwheat and nuts in a large bowl.
Melt the coconut oil, and drizzle this and the honey into the bowl.
Using your hands, mix everything together until everything is well coated
Line a couple of baking trays with baking parchment, and spread your mixture evenly onto these.
Place into the oven at 180 degrees, and bake for around 20 minutes, until crunchy.
Stir as often as possible to ensure no bits get stuck and burn!
Once crispy, removed from the oven and mix in the desiccated coconut and cranberries.
Store in an air tight container.
I serve this with greek yogurt, fresh fruits, or to top a smoothie bowl!

Ultimate Green Smoothie

vscocam-photo-19

If you are a follower of my blog, you will come to know that I love my green smoothies. They have become so unbelievably popular in the health community, and with good reason. It may raise a few eyebrows the first time you consume one of these bright green drinks in public, but the colour doesn’t reflect the taste! They are delicious and often surprise people in how much they DON’T taste of your garden patch!

Although I would highly recommend drinking one of these a day, don’t fall for the smoothies you can buy in shops. They are just full of sugar, and seem to only add the minimum amount of green produce required to change the colour. The Innocent “Easy Green” juice contains 79% apple juice and only 5% spinach. There is also a very high chance that the ingredients have been pasteurized, meaning that the fruit and vegetables will be heated to a really high temperature to increase the juices shelf life and to kill any potentially harmful bacteria. This also destroys a lot of the nutrients and enzymes in the produce. Washing your fresh fruit and veg is essential before making a smoothie or juice, but personally I have never found that drinking a homemade non-pasteurized smoothie to do me any harm! I also ensure when I make a smoothie, over half of it will be leafy greens.

vscocam-photo-1

Ingredients  (Makes 750 ml)

3 Bananas
1 Mango
1/2 Pineapple
2 Big Handfuls Spinach
2 Big Handfuls of Kale
2 Teaspoons of Wheatgrass Powder
1 Teaspoon of Spirlina
Handful of Ice Water (Depending on how thick you like it play around with how much you add)

Raw Chia Brownies


chiab4

Chia Brownie1

I’m so excited to share these brownies with you! I can’t tell you how delicious they are. So moist and gooey! You would never be able to tell these are made without refined sugar, dairy or gluten! I started out planning to make my chocolate truffles but I have a mass amount of chia seeds in my kitchen as part of a Christmas gift from my boyfriend, and I still haven’t made my way through them all, so thought it was time to start using them up! These little babies are bursting with nutrients and have become one of the well known super foods. As well as being loaded with antioxidants, they are also full of protein, about 14% by weight. Adding them to smoothies, salads, porridge, brownies or pancakes can give you that extra protein you might be looking for, especially if your a vegetarian or vegan.

Chia Brownie2Chia Brownie3Ingredients
(Makes around 10 Brownies)

6 Medjool Dates
1 Tbsp Cacao Powder
100 g Ground Almonds
4 Tbsp Coconut Oil
4 Tbsp Chia Seeds
50 g Sunflower Seeds
1 Tbsp Rice Syrup

Whack all the ingredients into a food processor and process until you have a gooey mixture- it should all hold together.
Empty the mixture in a baking tin lined with cling film, and smooth to the edges with the back of a spoon.
Leave in the freezer for a few hours to set.
I would recommend storing these in the fridge.

Cauliflower Pizza Base

pizza5

pizza4
Its Friday! And time for a treat, not that you have to feel guilty about eating this pizza..! By having a base made out of cauliflower, you can throw in can extra serving of vegetables without even realising! I have wanted to experiment with a cauliflower pizza base for a while, as the base I usually use is out of spelt, but I want a grain free alternative. My housemate and I both agree this is the best healthy base so far! This pizza is amazingly moist, and it actually stays together when you pick it up to take a bit of it, which I know can be a challenge when making a gluten free pizza. The recipe does include an egg so isn’t vegan- but you can replace this with a flax egg if needed.

I hoped mine with homemade vegan pesto (recipe coming soon), caramelised onions, goats cheese, asparagus and rocket, but you are literally free to do whatever you like on this! Every has their own favourites pizza toppings so get experimenting with yours! If you don’t have chia or flax seeds, don’t worry, the pizza with still taste delicious without them but they do add an extra kick of nutrients!

Also- I picked up this pizza baking try for £2 from Wilkinson- so if you don’t have one and want to get one.. It’s a bargain!

pizza2pizza3
Ingredients
Makes a 12″ Pizza

1 Whole Cauliflower
100 g Ground Almonds (or Ground Sunflower Seeds)
2 Eggs
Pinch Salt & Pepper
Pinch Dried Oregano
2 Tbsp Chia Seeds
2 Tbsp Flax Seeds

Whizz up the cauliflower in a food processor, and when you have a rice like consistency, pop the cauliflower in a microwave for 5 minutes.
Once microwaved, pop the mixture onto a nut bag (or a tea towel if you don’t have one), and squeeze out all the water, but be careful as it’ll be extremely hot!
Whisk the eggs, then add them to the cauliflower, with the rest of the ingredients.

Cover a pizza tray (or a normal baking tray if you don’t have one) with baking parchments, and spoon on the mixture into the middle.
Using the back of your spoon, flatten and spread the mixture so it nearly covers the whole tray, leaving a bit of room at the edges.
Bake in the oven before topping it with ingredients, for around 10 minutes at 180°.
Remove from the oven, top with sauce and the rest of your toppings, and bake for another 5 minutes.

Chocolate & Banana Milkshake

vscocam-photo-2-3vscocam-photo-1-3

Who says you can’t have chocolate for breakfast?! I normally go with oats, peanut butter and bananas or a green smoothie for breakfast, but I woke up this morning wanting a change and to try something different! The outcome was this beautiful smoothie, you have to try it to see how delicious it is, as well as being completely healthy!
Instead of using chocolate or cocoa powder, I used the raw form of chocolate we all know called cacao (pronounced ka-cow). I have used this many times in my blog before but I can’t reiterate how good it is for you! Using cacao instead of any processed forms we find in the majority of sweet snacks, you never have to felt guilty about eating chocolate again. Cacao has a whole wealth of antioxidants and nutrients, which can neutralise free radicals to help prevent aging! As well as being great for your health, it is also amazing for your mood; cacao contains a compound called theobromine which helps improve the availability of serotonin (a feel good chemical) in the brain.

vscocam-photo-3-2

Ingredients
Makes 700 ml

500 ml Almond Milk
2 Tsp Cacao Powder
3 Medjool Dates
3 Heaped Tbsp Oats
2 Bananas
2 Big Handfuls of Ice

Blend all together and enjoy!

Oil Based Skin Care Routine

skincare1

Today I am going to share a post with you a little different from my normal posts.. as these recipes are not edible.. they are for your skin! My housemate Nancy introduced me to natural home-made skin care last Autumn and I have been using home-made products ever skin.. and it has made such a difference! I have never had awful skin, but it was never smooth, very dry and blotchy. Since switching up my skin care routine it has never felt so good!

Contrary to what our common sense would tell us.. oil based skin care can actually work wonders for people who suffer with oily skin as well as acne. If you are using very harsh products on your skin, that will only strip away your faces natural oil, making it produce more! Using clean oils on your face such as olive oil or jojoba oil can drag out impurities and dirt that has built up in your pores. Using oil-based cleansing is also incredibly cheap way, once you have bought a few main ingredients it can last you at least a year!

For my toner I use apple cider vinegar, water plus a few tabs of aspirin. As well as loving to use apple cider vinegar in cooking, it is also great to use on your skin! Apple cider vinegar is incredible for acne, pimples, blemishes and spots by restoring our skin to the correct acidity, unclogging pores and creating a protective layer to prevent our skin getting too dry. Out of all the natural products I use on my skin, this is my favourite my far. My skin just feels amazing afterwards.

As well as the recipes below- I also use jojoba oil everyday for my moisturiser, or slather coconut oil on my face at night if I need some extra moisturisers. Coconut oil is also amazing for you hair!

Below are recipes for a make-up remover, toner and face-mask. You’ll want to buy yourself some bottles to put these in- I got mine for 50 p each from Wilkinsons.

 Skincare2

Make-up Remover/Cleanser
1 part Extra Virgin Olive Oil
1 part Vitamin E Oil 
1 part Witch Hazel
7 parts Water

skincare4

Toner
3 part Apple Cider Vinegar– make sure it is organic, and has ‘mother’ in the title.
7 part Water
1 tab of Aspirin dissolved in the mixture. Ensure there is no coating on the aspirin!

skinare3
Fask Mask
2 Tbsp of Turmeric
3 Tbsp of Brown Rice Flour
5 Tbsp Extra Virgin Coconut Oil 

So this last one might seem a little weird! But trust me it works. Although you may look like a Simpson when you put this on your face- it is AMAZING for blemishes and dark circles. The turmeric works as an anti inflammatory, and will soothe any redness you have on your face. The brown rice flour is option- but exfoliates your face amazingly. Apply enough to your face to over it (right up to your eyes to cover those bags!). Leave on for 15 minutes then rinse off. If you have any staining of your skin, it will always fade within the hour- but I would recommend doing this at night so you don’t have any yellow on your face during the day! Apple cider vinegar on a cotton wool pad also works amazingly at getting any residual face mask left on.

‘Reeses’ Vegan Peanut Butter Cups

Processed with VSCOcam with c1 preset

My housemate Helen has a real sweet tooth… With a love of chocolate like I have never seen before. I never have cravings for anything sweet myself- so when I bake treats, I out them to Helen for the test. If she’s satisfied them I know it’s good. Reeses Pieces are a particular favourite of hers, so I wanted to recreate these for her, whilst ensuring they were packed with nutrients and void of any refined sugars! And I succeeded.

The first time I made these I ate them all before I had a chance to blog them… Which worked fine with me as I just HAD to make some more! These are completely raw, topped with homemade chocolate, filled with chia and flax seeds. Eating some of these babies will leave you glowing and guilt free.. If you don’t have the ingredient to make raw chocolate (although I would highly recommend investing!) you can top the base with melted dark chocolate. It will still be incredible.

Processed with VSCOcam with c1 preset vscocam-photo-2-2
Processed with VSCOcam with c1 preset

Ingredients (Makes 15-20)

Base
250g Ground Almonds
7 Medjool Dates
2 Tbsp Flax Seeds
2 Tbsp Chia Seeds
3 Tbsp Peanut Butter (Make sure you use a peanut butter made from JUST peanuts!)
3 Tbsp Melted Coconut Oil

Raw Chocolate Topping
75 g Raw Cacao Butter
3 Tbsp Cacao Powder
2 Tbsp Rice Syrup
Pinch of Salt

Start by placing all the ingredients in a food processor, and processing until they are all completely mixed, and hold together well.
Using silicon cupcake moulds, layer the base into the bottom, flattening down the top.

Melt all the cacao butter in a pan, and add in the cacao powder and rice syrup, heating very gently. Ensure it doesn’t boil. Taste to your own preference, add more cacao butter if it is too rich.
Pour in the melted chocolate over the base.
Set in the freezer, and store in the fridge.

Quinoa Pancakes

vscocam-photo-4So taking a break from posting on the blog due to being exceptionally busy, I am back with lots of new clean and simple recipes! You can look forward to chocolate fudge brownies, raw chocolate, peanut butter cups, plus the usual abundance of smoothies. The past couple of months I have been getting back into my research at University, as well as attending medical interviews and trying to stay on top of work. I was so happy to find out I have been offered a place at Kings College to study medicine so hopefully I can incorporate a wider knowledge of nutrition once I start…!

Now onto the recipe… I realise this may have been much more appropriate to post a couple of weeks ago before Pancake Day but I couldn’t get myself organised enough to get it up on time.. but I don’t think you ever need an excuse to eat pancakes so for me, any time of the year is perfect! I think these are the healthiest pancakes I have made to date, and pretty protein rich!

vscocam-photo-2-1

The flour I use is quinoa flour- so it gives a much lighter pancake rather than using oats which is what I usually use. Quinoa (or KEEN-wah for those who have trouble with the pronunciation) has had a lot of media attention recently, and quite rightly, it is extremely nutritious. Containing all the essential amino acids our bodies need, which is great for vegetarians or vegans who struggle to get enough protein into their diets. It has a low glycemic index which is great for those watching their weight, or diabetics. You won’t get that blood sugar spike that comes with eating high glycemic foods (and the invertible crash that comes after), that is associated with obesity and hunger stimulation. It is also my favourite grain, and can be eaten in so many different ways! I like cooking mine in apple cider vinegar to give it extra flavour.

You can buy quinoa flour in health food stores or online, but I think the cheapest way to use it is to make it yourself. It means you can only make what you need, as quinoa flour is one of the most expensive flours. It is incredibly simple to make, but you do need a food processor, so if you don’t have access to one of these I would suggest buying from Amazon as the cheapest option. If you live in Bristol, the health food shop just off Cotham Hill, Earthbound, is a dream and you can source the flour from there. If you can’t afford quinoa flour, brown rice flour is a cheaper alternative great for gluten free cooking.

vscocam-photo-1-1

vscocam-photo-3-1Ingredients

1/2 Cup Quinoa Flour
3/4 Cup Almond Milk
1 Egg (or a Flax Egg if Vegan)
Pinch of Salt
Coconut Oil

Combine all the ingredients together in a food processor (except the coconut oil).
Let this mixture sit in the fridge for half an hour.
Heat up a teaspoon of coconut oil in a pan, once melted pour a scoop of the pancake mixture into the frying pan.
Once you start to see ‘pores’ appear on the face of the pancake, which should take a few minutes, flip it over.
Cook for a few minutes and keep warm in a preheated oven at a low temperature until you have cooked them all!

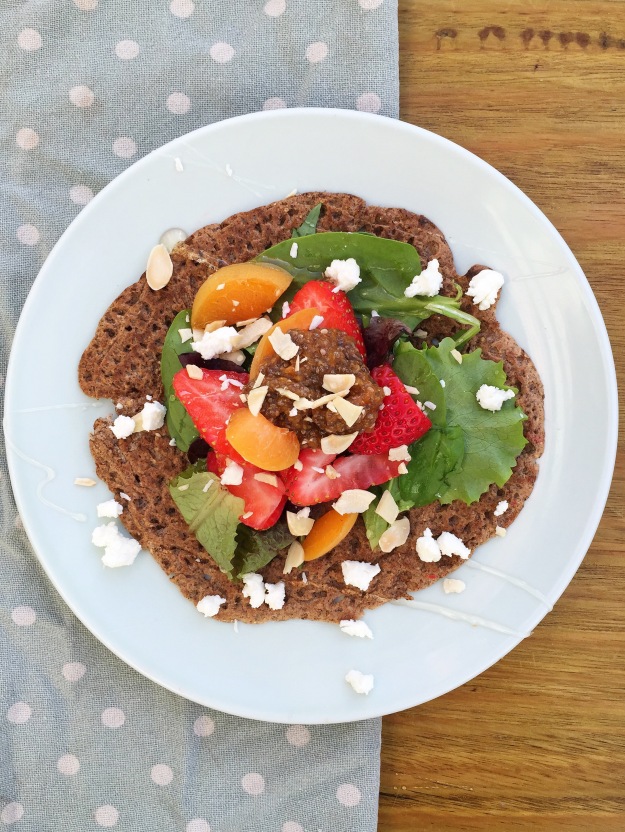
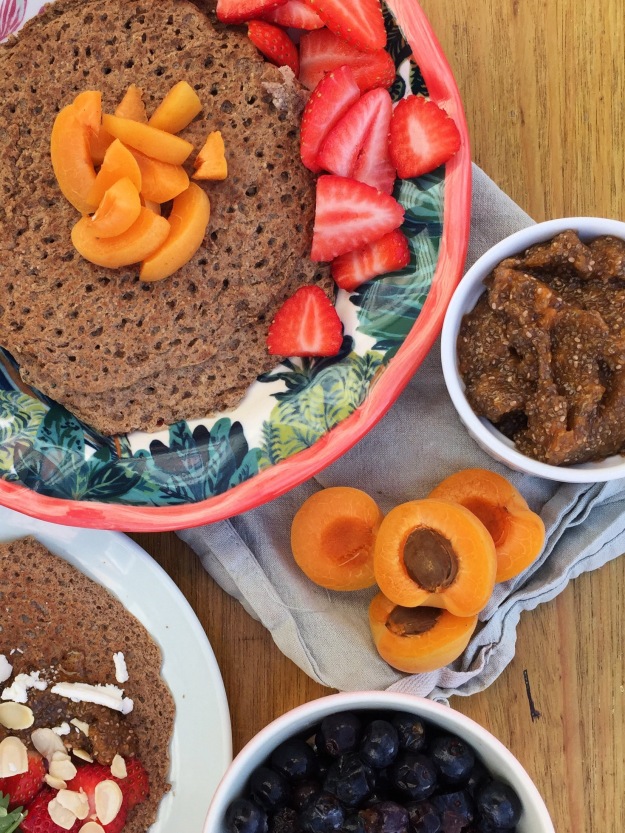
I served mine with peach chia jam, strawberries, goats cheese and spinach, but choose whatever toppings you fancy!
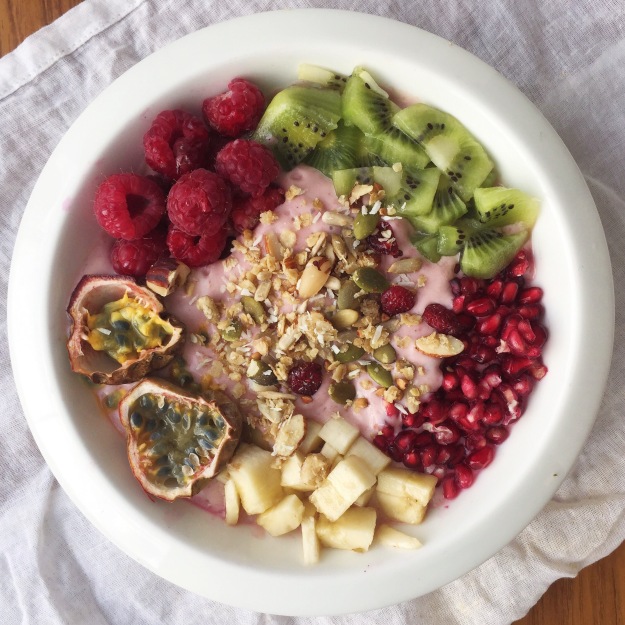
Butternut Squash, Kale & Goats Cheese Superfood Salad

vscocam-photo-2vscocam-photo-1My body is no longer craving the cold refreshing salads it did in the summer, I want warming with rich comfort food, which is why I created this salad. With the soft sautéed kale mixing with the cooked tender butternut squash and cooked quinoa, this salad will keep your taste buds happy, combining gorgeous textures together. Another thing I love about this dish is how colour it is, there is so much going on, making it an incredibly beautiful meal. Plus, as we all must of heard, eating more colour equals more nutrition (unless your talking about smarties…)!

As you might have been able to tell from previous recipes, I am a huge fan of butternut squash. You name it, it can be done with butternut squash. From adding to curries, salads, using as a pizza base or topping, the possibilities are endless!  Being incredibly rich in Vitamin A, it can help maintain optimum eye and skin health! The tender texture of the squash combines perfectly with the butter beans, making sure to leave you full after your meal.

vscocam-photo-3Ingredients 

1/4 Cup Butternut Squash Cubed
1/4 Cup Cooked Butter Beans
1/2 Onion Diced
1 Garlic Clove Diced
1/4 Cup Quinoa
2 Big Handfuls of Kale
2 Tbsp Pine Nuts
2 Tbsp Cranberries
1 Tbsp Soft Goats Cheese
1 Tbsp Honey
1 Lemon
Olive Oil
Apple Cider Vinegar

Combine the butternut squash, butter beans, garlic and onion in a frying pan with a lick of olive oil. Cook until the butternut squash is soft, stirring frequently.
While the butternut squash is cooking, add boiling water to the quinoa and a splash of apple cider vinegar. This should take around 10-15 minutes to cook.
Add the kale with the honey and 2 tbsp of water.
After around 3 minutes the kale should have wilted and turned a vivid green colour, at the point stir in the cooked quinoa, and add the rest of the ingredients.
Serve with a squeeze of lemon on top, a dash of apple cider vinegar and olive oil.